
 Wall Decor
 Textiles & Rugs
 Flowers & Plants
 Candles & Candle Holders
 Furniture
 Home Accessories
 Window Treatments
$2 DOLLAR TREE GLAM CANDLE HOLDERS DIY’S | 3 PC CRUSHED GLASS CANDLE HOLDER
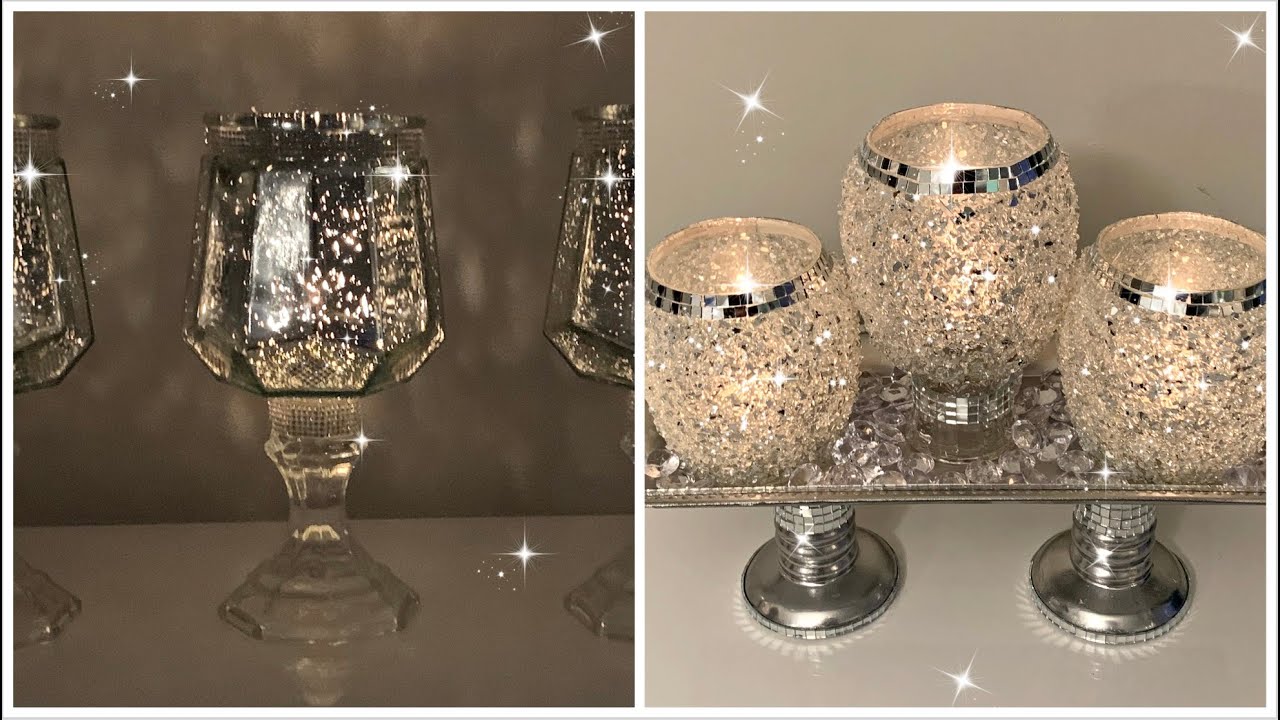
$2 Dollar Tree Glam Candle Holders DIY: 3 PC Crushed Glass Candle Holder
Creating beautiful home décor doesn’t have to break the bank. In this DIY guide, we’ll show you how to make stunning candle holders using items from Dollar Tree, specifically a three-piece crushed glass candle holder that will add a touch of glam to any space.
Materials You’ll Need
- Candle Holders: Three Dollar Tree candle holders (or similar from Goodwill)
- Bling Trim: Dollar Tree’s adhesive bling (2–3 rows)
- Gorilla Glue: For secure adhesion
- Mirror Tile: Cut in strips from Dollar Tree
- Crushed Glass: To fill the holders
- Mod Podge: To secure the crushed glass
- Spray Paint: Metallic silver (Rust-Oleum recommended)
- Additional Tools: Foam brush, scissors, large bowl of water
Step-by-Step Instructions
Step 1: Decorating the Candle Holders
Prepare the Holders: Start with the three candle holders. If you find them at Dollar Tree, that’s perfect! Otherwise, look for similar sizes at thrift stores.
Attach Bling Trim: Using Gorilla Glue, adhere adhesive bling around the necks of each candle holder. Depending on the look you want, use 2-4 rows of bling for a dazzling effect.
- Glue Holders: Once the bling is dry, stack the holders together to create height variation. Ensure they are securely glued using Gorilla Glue.
Step 2: Creating the Second DIY with Crushed Glass
Select Your Glass: For the second part of the DIY, you can either use slimmer candle holders from Dollar Tree or find alternatives at Goodwill.
Paint the Holders: If your holders aren’t silver, spray paint them with metallic silver paint and allow them to dry.
- Add Mirror Tile: Cut mirror tiles in individual strips. Start adding them around the top of the candle holders for additional glam factor, securing each piece with glue.
Step 3: Filling with Crushed Glass
Prepare the Crushed Glass: Get a container for the crushed glass. Apply a layer of Mod Podge inside your painted candle holders.
Apply Crushed Glass: Use your hands or a brush to pack the crushed glass onto the Mod Podge. Allow it to dry fully.
- Seal the Glass: Create a sealing mixture with a ratio of 2/3 water and 1/3 Mod Podge. Brush this mix over the crushed glass to keep it shiny and in place.
Step 4: Assemble the Tray
Tray Preparation: Use a tray from Dollar Tree, spray paint it, and then attach handle holders using Gorilla Glue.
- Final Assembly: After all components are dry, place the candle holders on the tray. Use additional glue to secure them in the center.
Step 5: Finishing Touches
Once everything has dried, you can further enhance the aesthetic by adding a row of mirror tiles around the tray or further decor to your liking.
Conclusion
Your $2 Dollar Tree Glam Candle Holders are now complete! This DIY project not only looks stunning but is budget-friendly and customizable to fit any home décor style. These holders make excellent gifts for any occasion or festive season.
Don’t forget to share your progress and let us know if you loved this DIY! Happy crafting!

I loved the crushed glass. EXQUISITE 😂
That Is Beautiful 😍 Beverly ….
Beverly, they are so pretty your crushed glass candle holders..
I went to Dollar 💵 Tree 🌳 yesterday, & bought some candle holders, I bought the tall skinny ones since they didn't have the thick glass ones that, I wanted.
💎🩵💎🩵💎🩵💎🩵💎
Beautiful as always!
Wow nice
Awesome sauce 🫙
Beautiful
I like them both
Both are beautiful and I can see where I can change up the color of the crushed glass for my sunroom, bedroom, bathroom, etc. Thank you for sharing!
Just beautiful 😍
Thanks for sharing
Both are nice
Love the second set
Beautiful
I'm going to try it
Love it
Beautiful
Hello Beverly
They both my favorite so nice t4s
Love both of them
Love the second one
I love the silver tray with the candles.
I love the 2nd one
# 2
YES to everything everyone else has said! But where did you get that glue gun??
Great work
I love both sets.
2nd set absolutely 💯
#2 is gorgeous!
Love these so much
Love them both
They are both absolutely beautiful, I love the way you made them . But I will tell you which one is my favorite it's the 1st Set, I like both But I think I like the 1st set better !!!! 🙂