
 Wall Decor
 Textiles & Rugs
 Flowers & Plants
 Candles & Candle Holders
 Furniture
 Home Accessories
 Window Treatments
7 CLEVER Picture Hanging Tricks Everyone Should Know
7 Clever Picture Hanging Tricks Everyone Should Know
Hanging pictures can be a daunting task, but with these seven clever tricks, you’ll transform your wall art experience from frustrating to fun. Whether you’re a seasoned decorator or a novice, these tips will ensure your pictures hang perfectly every time.
1. Use Toothpaste for Precise Measurements
Struggling with precise nail placement? A dab of toothpaste can be your best friend. Simply apply a small amount of colored toothpaste to your picture hook. When you press your picture against the wall, the toothpaste will leave a mark exactly where you need to nail in. This method helps eliminate guesswork and ensures perfect alignment.
2. Command Strips for Damage-Free Hanging
If you’re looking for a solution that won’t damage your walls, command strips are the answer. Make sure to clean the surfaces of both your picture frame and the wall with rubbing alcohol to ensure proper adhesion. Apply the strips in pairs, wait an hour for the adhesive to cure, and you’ll have a hassle-free, damage-free hanging experience.
3. Create a Dust Catcher with Painter’s Tape
When driving in drywall anchors, avoid a mess by creating a dust-catching solution. Use painter’s tape as a catch to collect debris, or place a sticky note folded on the wall. Both methods will help keep your workspace clean, making the entire process smoother.
4. Utilize Painter’s Tape for Layouts
Painter’s tape is a powerful tool for planning your picture arrangements. Lay strips of tape across the wall where you want the pictures to go, marking where the nails should be placed. This method not only aids in alignment but also acts as a guideline for leveling your artwork.
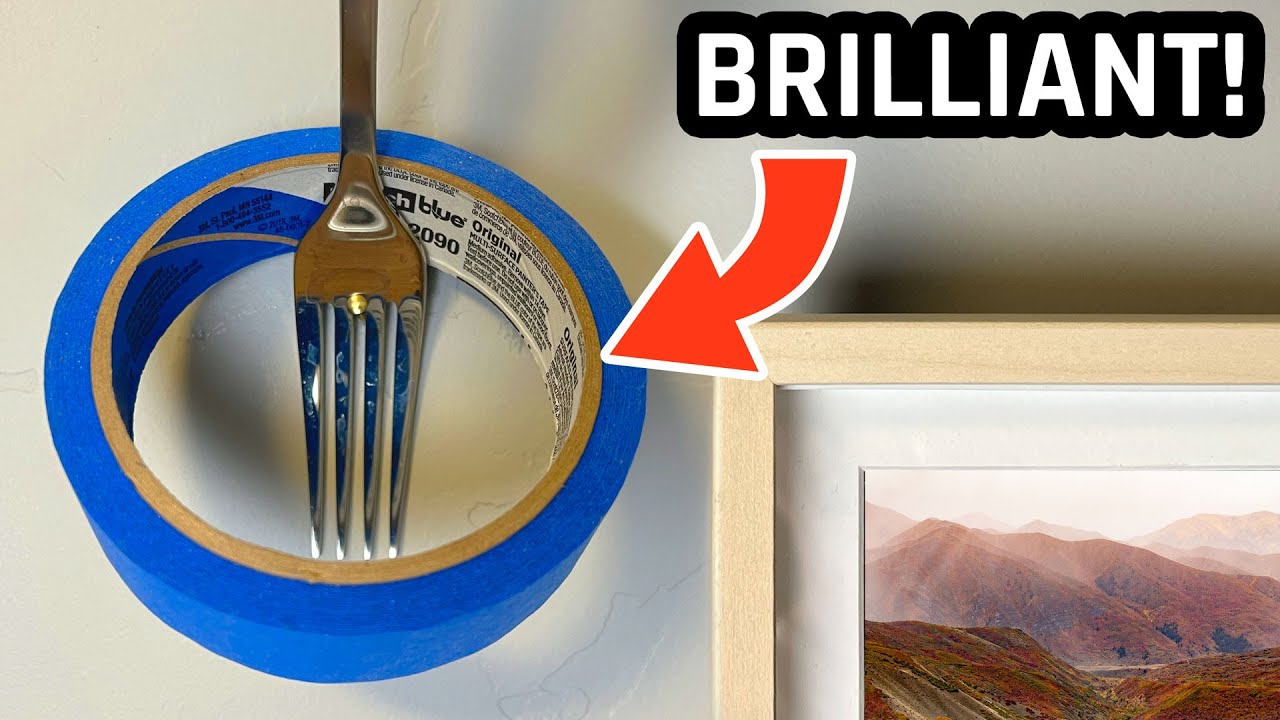
5. Employ a Fork for Hanging Wires
Have you ever had trouble catching the wire on a nail or screw? Instead of struggling, place a fork on the nail or screw. The fork acts as a hook, helping you easily maneuver the wire into place. Once your picture is securely hung, simply remove the fork.
6. Make a DIY Picture Hanging Tool from a Cereal Box
Forget expensive tools; you can create your own picture hanging guide using materials from home. Cut the side of a cereal box into a handy tool and use a push pin to mark where nails should go. This DIY approach is effective and cost-efficient for ensuring perfect placements.
7. Tackle the Beast of Picture Galleries
When it comes to creating collages or galleries, planning is key. Use gift wrap or butcher paper to layout your arrangement on the floor before transferring it to the wall. Trace the outlines of each picture, cut out the excess paper, and use it as a template to ensure accurate placements without the hassle of multiple adjustments.
Conclusion
By incorporating these seven clever tricks into your picture-hanging routine, you’ll save time, avoid messes, and achieve perfectly aligned artwork every time. From using toothpaste for precise measurements to employing painter’s tape for layouts, these tips will make your walls reflect your style effortlessly. Happy decorating!


Get guide. Thank you!
Loved this video…literally saved the day for me!
I am getting ready to hang a photo collage and your tips will make it a snap! Thank you!
Great video, great tips! I found it funny that you said “dork factor” while standing in front of some Star Wars wall art. That Death Star schematic is really cool! I wish we could have seen the rest of them. Keep up the good work and may The Force be with you!
Thought drills were used on brick internal walls , screwdrivers can make holes 🕳️ in plasterboard.
Woah. Do NOT use isopropyl alcohol (rubbing alcohol) to clean a painted wall. I learned this the hard way. It will rub the paint off of the wall.
Hahaha! I love the power drill photo. So dramatic!❤😂 thanks for the tips! I learned a lot!
The tape tip was perfect! Thank you again
Thank you for these great tips!
I can't thank you enough! These tips seem so logical but you don't know until you know. I have had a magnetic board that will go on a door sitting around for months because I didn't want to tackle figuring out how to hang it straight. Got it now. Thanks.
Just subd.
you genuinely changed my life thank you
Thank you
6:34 Why bother with the cereal box, just place the pin and put some masking tape on it.
No way command strips. A big no no
What size nails are these? I don’t see it listed on the product list.
This was sooooo helpful
Command strips never work. They drop off the wall each time
Thank you for this video! I used this for a Framebridge gallery wall. I used wrapping paper that had a grid on it (plus a level), arranged 4 pictures that had corner brackets and punched holes through with a thumbtack.
With the 1st type of frame that you used toothpaste on. I take off the back board. Drill holes in it where hooks are. Then you can just put against wall and mark holes with pen/marker through holes.
You’re meant to put wire between those hooks and hang the frame on one central nail. Why are you making so difficult? 🤦♂️ 😆
Wow I just learned so much in 10 mins! Thank you for solving all my problems and then some 🤩 Great video, I’ll be saving this one!!
Tip one, put toothpaste on the wall, sorry now only looking the other tips for a joke!
Toothpaste was the best option for me! Thank you ❤