
 Wall Decor
 Textiles & Rugs
 Flowers & Plants
 Candles & Candle Holders
 Furniture
 Home Accessories
 Window Treatments
Beautiful Resin Sea Candle Holders Cure in Just 2 Hours!
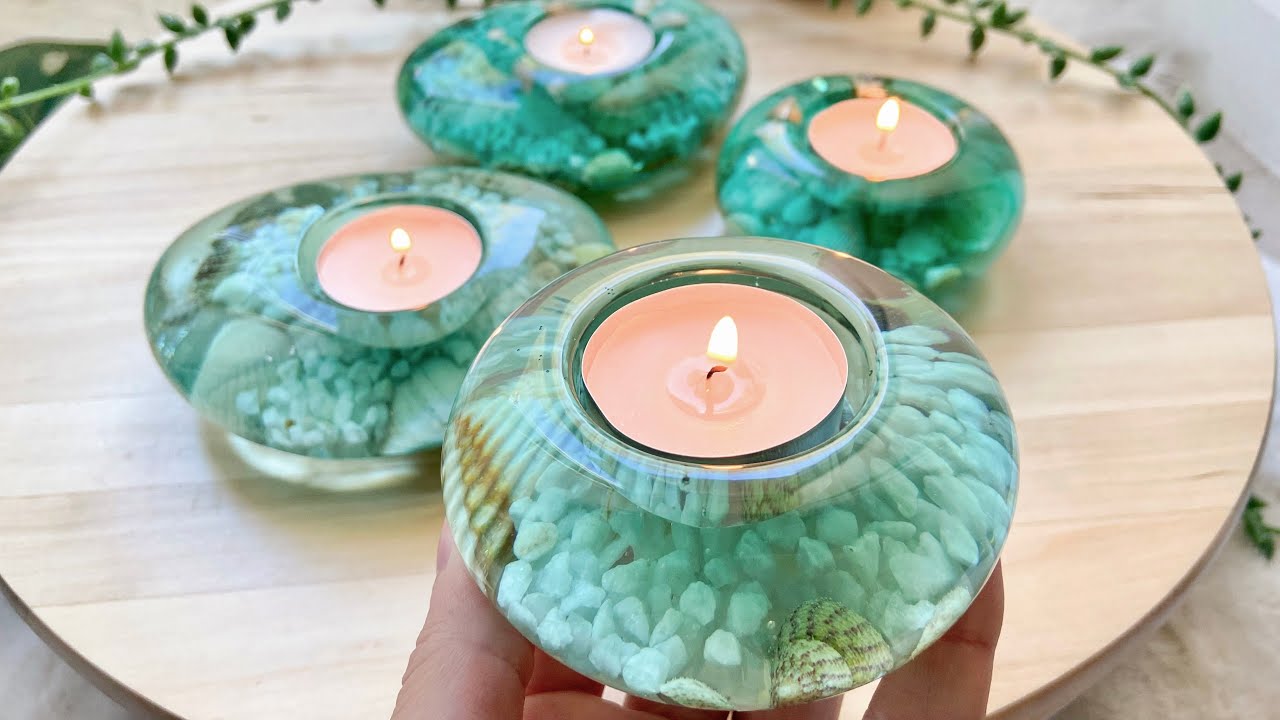
Beautiful Resin Sea Candle Holders Cure in Just 2 Hours!
Are you ready to add a touch of beachy elegance to your space? In this article, we will guide you through the fun and creative process of making stunning resin sea candle holders that cure in just 2 hours. With the right materials and a little patience, you’ll have beautiful, unique decor in no time.
Materials You’ll Need
To create your own resin sea candle holders, gather the following supplies:
- Epoxy Resin: We recommend a high-quality epoxy resin with a 1:1 mixing ratio by volume—like Let’s Resin.
- Silicone Molds: Look for tealight candle holder molds to achieve the perfect shape.
- Shells and Pebbles: Collect small beach shells and pebbles to add a natural element to your candles.
- Alcohol Inks: Use colors like cerulean and green to tint your resin while maintaining transparency.
- Heat Gun: Use this handy tool to eliminate air bubbles from your resin mixture.
- Smart Curing Machine: Investing in a smart curing machine allows your projects to cure fully in just 2 hours, ensuring a quicker turnaround.
Step-by-Step Instructions
1. Mix Your Resin
Start by measuring equal parts of A and B components of your resin in a cup. Mix thoroughly for several minutes to ensure a complete blend.
2. Add Color
Carefully add a few drops of alcohol ink to your resin mix. Stir until you’re happy with the color, making sure not to add too much to maintain clarity.
3. Prepare the Molds
Pour the first layer of your resin into the molds, filling them to about halfway. Use your heat gun to pop any air bubbles that may form.
4. Add Shells
While your first layer is still tacky, begin placing your beach shells into the resin. Be sure to choose lightweight shells that won’t sink. Position them near the center to avoid floating.
5. Cure the Resin
Place your molds inside the smart curing machine, close the lid, and press the power button. Check the progress after 2 hours; you’ll be pleasantly surprised by the results!
6. Final Layer
Once the first layer has cured, mix a new batch of resin, add more shells and some small pebbles, and pour the final layer into the molds. This time, let the resin cure for another 2 hours.
7. Demold and Finish
After the full curing time, remove the candle holders from the molds. While some shells may have sunk or settled, the overall effect will still be stunning.
Tips for Success
- Be patient when it comes to layering; waiting for the first layer to cure before adding shells can yield better results.
- Before pouring layers, consider letting your resin sit for a few minutes to allow air bubbles to rise to the surface.
- Experiment with different color combinations and shell arrangements for a unique touch.
Conclusion
Creating beautiful resin sea candle holders is a fun and rewarding project that allows you to bring a piece of the beach into your home. With a smart curing machine, the wait for your stunning creations is only 2 hours! Whether you keep them for yourself or gift them to a friend, these candle holders will surely impress.
For all the materials mentioned, check the links in the description to find exactly what you need to get started on your crafting journey. Happy crafting!

so cute🎉
Absolutely beautiful .. I love them ! ❤
❤❤❤❤ thank you. I'm ready to get creative!!
These are lovely! I'm making a resin lamp and keep underestimating how transparent and pale the resin needs to be for my shells to show up 🙄 trying my 3rd attempt today, and I'm going to do a sphere using this technique: mostly blue with some transparent iridescent flake glitter, then blue with shells on the bottom with no sand so the light can travel.
I love these need these molds
Those are really beautiful. Would it be safe to make a 3'' candle holder with resin or would it be a fire hazard? I am wondering if resin would burn or melt or brake or whatever because of the flame
when heated, the resin releases chemical elements into the air which will not be very useful for our remaining days)));) think before you light a candle.
❤❤❤
Love your channel Nadia, you are so talented. Trying to find your video of the tray with ocean scene ( rectangle) . I'm 69 but never too old to learn something new and you are a great teacher. God Bless
Do you use bubble remover machine? And can you do this with regular (art resin) epoxy resin in the machine?
Why did my shells sink below the rock pebbles. I put clear in first and then the shells and rocks but all my shells sunk to the bottom. Please help
Do the candles ever affect the resin to the point they melt or distort the resin??
Tara Jim’s wife I love these yahoo fun u make it ugh I had to throw a mold away today very sad I didn’t put enough hardner in it it all stuck on the mold got every where on my clothes my eyes feel stick all over my hand hair couldn’t get it out of the mold sticky Gods good I threw mine away but did so do other ones I’m not well my husband is dying so I try to do crafts for my self thank u for showing us these I love them
I think they have turned out beautiful!😍
Can u pour wax candle directly into these
These are gorgeous 😍
Does this tea light holder burns after placing candle on it?
I would LOVE to make this!!!
Uhhh gorgeous!
This is really cute! New to your channel and i am in love. I just cannot understand, small white peaces, look like rise, what is it?
Wow so pretty ❤
That’s funny, ‘shell rampage’
このモールドは結構樹脂の量使いますよね
I Love these! Really gorgeous! <3
Beautiful 😍
You make me very satisfyied to start the rezin project 🥹
Do you think Nadia i can success in this field 🥺
Оригинально!
Nice job. I love the new molds
Beautiful!
Wonderfull❤