 Wall Decor
 Textiles & Rugs
 Flowers & Plants
 Candles & Candle Holders
 Furniture
 Home Accessories
 Window Treatments
How to make a beautiful Diy Wall Clock with lights,home decor,Creative idea, making PVC pipe
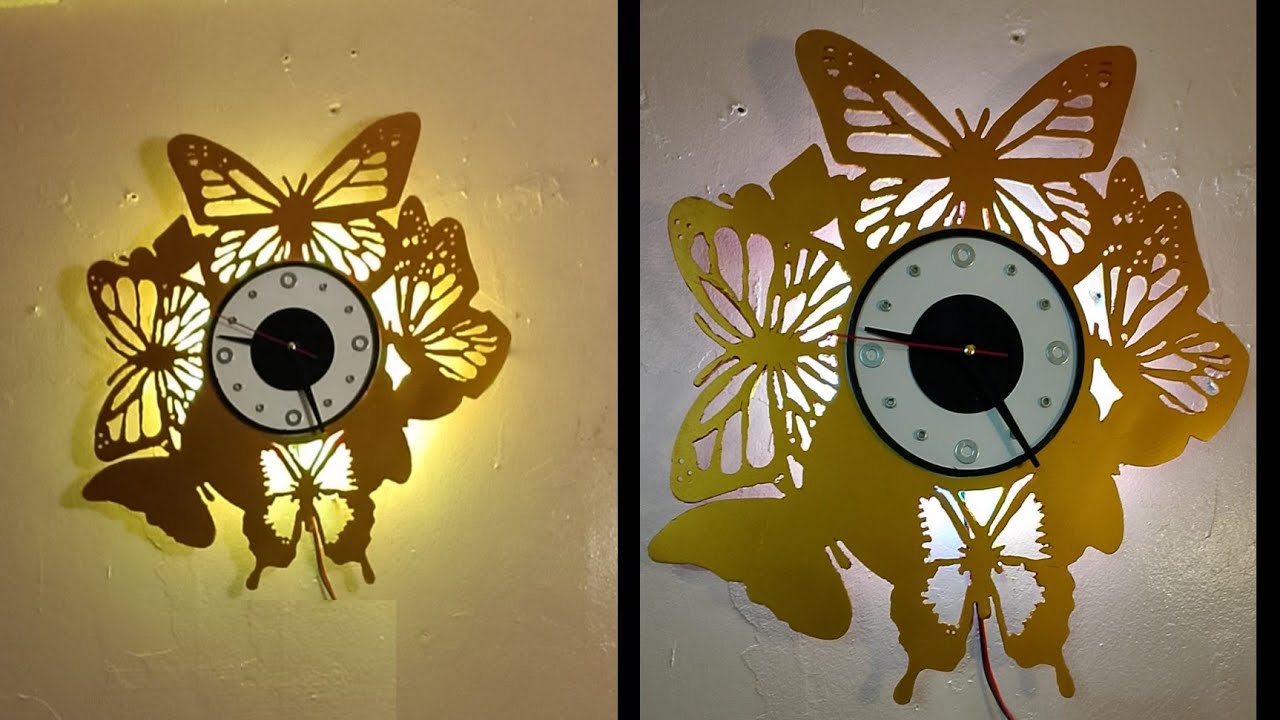
How to Make a Beautiful DIY Wall Clock with Lights: A Creative Home Decor Idea Using PVC Pipe
Creating a unique wall clock can enhance your home decor while showcasing your creativity. This step-by-step guide will help you make a stunning DIY wall clock with lights using PVC pipe. Perfect for any space, this project is both fun and functional.
Why Use PVC Pipe?
PVC pipes are inexpensive, lightweight, and easy to work with, making them an excellent choice for DIY projects. Their versatility allows you to create intricate designs and shapes, perfect for a modern wall clock.
Materials Needed
- PVC Pipe (various lengths)
- Clock Mechanism Kit (includes clock hands)
- LED Strip Lights or Fairy Lights
- Power Source for Lights (battery pack or plug)
- Paint or Adhesive Spray
- Drill with Hole Saws
- Sandpaper
- Ruler or Measuring Tape
- Pencil
- Craft Knife
Step-by-Step Instructions
1. Design Your Clock
Start by sketching your clock design on paper. Decide on the size and shape of your clock face.
2. Cut PVC Pipe
Using a craft knife, cut your PVC pipes into various lengths based on your design. You might want longer pieces for the clock’s radius and shorter ones for decorative elements.
3. Create the Clock Face
Choose a large circular piece of cardboard or wood for the base of your clock.
- Mark the Center: Find the center point for the clock mechanism.
- Drill a Hole: Use a drill to create a hole for the clock shaft in the center.
4. Assemble the Design
Arrange the cut PVC pipe pieces on the clock face according to your design.
- Glue the Pieces: Use adhesive spray for a permanent hold.
- Sand Edges: Smooth any rough cuts with sandpaper.
5. Attach the Clock Mechanism
Once the base is dry:
- Insert the clock mechanism into the drilled hole.
- Attach the clock hands according to the manufacturer’s instructions.
6. Add Lights
To make your clock stand out, add LED strip lights:
- Measure and Cut: Measure the length of PVC pieces and cut the LED lights accordingly.
- Attach Lights: Adhere the lights along the PVC pipes or around the clock edges.
- Connect Power Source: Make sure the lights are connected to the power source, whether it’s a battery pack or a plug.
7. Finishing Touches
- Paint the PVC: If desired, spray-paint the PVC pipes in your favorite color to complement your home decor.
- Test the Clock: Before hanging, ensure everything works seamlessly, and the lights illuminate correctly.
8. Hang Your Clock
Choose a prominent wall space and hang your DIY wall clock using the appropriate hardware.
Conclusion
Creating a DIY wall clock with lights using PVC pipe is a rewarding project that adds a personal touch to your home. Not only do you get a functional piece, but you also engage in a creative endeavor that showcases your design skills. This unique decor item is sure to be a conversation starter and brighten any room. Enjoy your crafting, and let your creativity shine!


Maravilloso trabajo amigo!!!